Ultimaker Cura slicer software is a powerful tool that helps you get the most amazing quality 3D prints. To get the best final print result, learning how to use the quality settings is important.
The “Quality” section of the print settings panel in Cura includes layer height, initial layer height, and line width settings. These are super important settings that affect the overall quality of your print.
Dialing in these settings will yield smoother and more detailed 3D prints.
So, whether you're a beginner or an experienced 3D printing enthusiast, learning how to use the quality settings in Cura 3D slicer is essential for achieving the best possible results.
If you are new to Ultimaker Cura, be sure to start with How to Use Ultimaker Cura for 3D Printing: A Beginner’s Guide before you get into this tutorial.
Print Quality – Using Preset Cura Profiles
While I will focus on custom quality settings in this tutorial, I want to take a minute to explain the preset profiles that Cura offers at the top of the print settings menu.
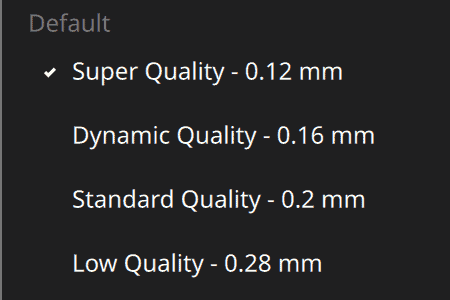
- Super Quality
- Dynamic Quality
- Standard Quality
- Low Quality
In the video tutorial, I have chosen the pre-set profile, Standard Quality. However, this is only for demonstration purposes, and you will want to select a base profile that most closely relates to what you want to print.
For example, if you need a thin layer height for a more detailed print, you would choose the Super Quality profile as your base and customize it from there.
What is Layer Height in 3D Printing?
By now, you probably have a good understanding of how a FDM 3D printer works. Each layer is printed on the layer before it, creating the 3D-printed object.
Simply put, the “layer height” is how thick or high each layer of your print is. The thickness of the filament or material is extruded on each layer of the print.
You can change this setting to make each layer thinner or thicker, depending on your goals for the project.
For reference, I will use thin/small and thick/large interchangeably throughout this article and in the video tutorial.
Layer height affects many other settings, such as:
- Top/Bottom Thickness
- Top Layers
- Bottom Layers
- Minimum Skin Width for Expansion
- Infill Layer Thickness
- Regular Fan Speed at Height
- Regular Fan Speed at Layer
- Support Overhang Angle
- Support Z Distance
- Support Top Distance
- Support Infill Layer Thickness
- Support Interface Thickness
- Raft Top Layer Thickness
- Raft Middle Thickness
Initial Layer Height
The initial layer height is the setting that determines the thickness of the first layer of the print that adheres directly to the build plate. Therefore, this setting significantly impacts the first layer of your print.
I'm not addressing the initial layer height setting in this tutorial and will leave it on the default setting of 0.2mm.
Printing the first layer successfully depends on many variables and other Cura settings. You'll need to know about all the different settings in Cura that create a great first layer in addition to initial layer height, such as the print bed temperature, the initial speed setting, or adding a brim if you have adhesion issues.
Read: Cura Build Plate Adhesion Types & Settings Guide
In a separate tutorial, I'll show you how to use Cura to get a flawless first print layer that will ensure a high-quality print result.
Choosing a Layer Height for Your 3D Print
I always get asked, “Hey Chris, how do I decide what layer height to use?” It's a great question, and a hard one to have a cookie-cutter answer for. Your layer height is going to be dependent on your project's requirements.
The final thoughts of this article will give you my preferred layer height settings and what projects I use them for, but don't head there just yet!
There are several pros and cons for both thin and thick layer heights that you should know before deciding which to use.
Printing Smaller Layer Height – Pros and Cons
Generally, if you use a thinner layer height, you'll get a higher-quality print with a smoother surface, and more details will be visible in the vertical direction (up and down). But there are some disadvantages that come with thin layers that could affect your print or even lead to print failures.
| Pros | Cons |
|---|---|
| Higher-Quality Prints finer details and smoother print surfaces – small, intricate parts or 3D models | Longer Print Time smaller layers will increase the print time because it requires more layers to complete the model. |
| Better Accuracy and Precision improved contouring of the subtle curves of more complex shapes | Nozzle Problems Clogging and damage can occur because there is more pressure on the printer nozzle |
| Tolerance for Complex Shapes create complex shapes and models with more precision | Higher Risk of Failed Prints Smaller layer heights can be more challenging to print correctly and are more prone to errors such as warping, shifting, or uneven layers. |
| Less Visible Layer Lines creates smoother curves and more organic shapes | Limited Materials Not all materials are suitable for printing with small layer heights, and some may require special equipment or expertise to use them effectively. |
| Other Settings Matter other settings need to also be set properly, or the printer may struggle |
Overall, the decision to use a smaller layer height depends on the specific project and the desired outcome. While smaller layer heights can offer benefits in terms of quality and detail, they may also require more time, effort, and expertise to produce a successful print.
Printing Larger Layer Height – Pros and Cons
Using a thicker layer height, each layer will be printed more quickly, and you will get your print faster. However, you may sacrifice some quality and detail in your final print.
| Pros | Cons |
|---|---|
| Faster Print Speed since each layer is thicker, the print time decreases | Lower Print Quality expect lower quality and less detail – less suitable for highly-detailed objects or models. |
| More Durable Prints creates stronger and more durable prints – suitable for functional objects or parts. | Visible Layer Lines creates more visible layer lines on the final print, giving it a rougher surface finish. |
| Fewer Nozzle Problems: less pressure is on the nozzle, reducing the chance of clogging and other issues. | No Fine Details unsuitable for creating small or intricate parts requiring finer details and smaller layer heights. |
| Tolerance for Print Imperfections: more forgiving of print imperfections, such as minor warping or shifting. | Lower Accuracy and Precision may result in lower accuracy and precision in the final print. |
| Efficient Filament Use less filament is used for the print, which can save money on material costs. | Higher Risk of Warping Larger layer heights can be more prone to warping or shifting during printing, especially on larger or more complex objects. |
Overall, the decision to use a larger layer height depends on the specific project and the desired outcome. While larger layer heights can offer benefits in terms of speed and efficiency, they may also sacrifice some quality and detail in the final print.
How to change the layer height setting in the print settings menu
Layer Height Comparison of Real 3D Prints
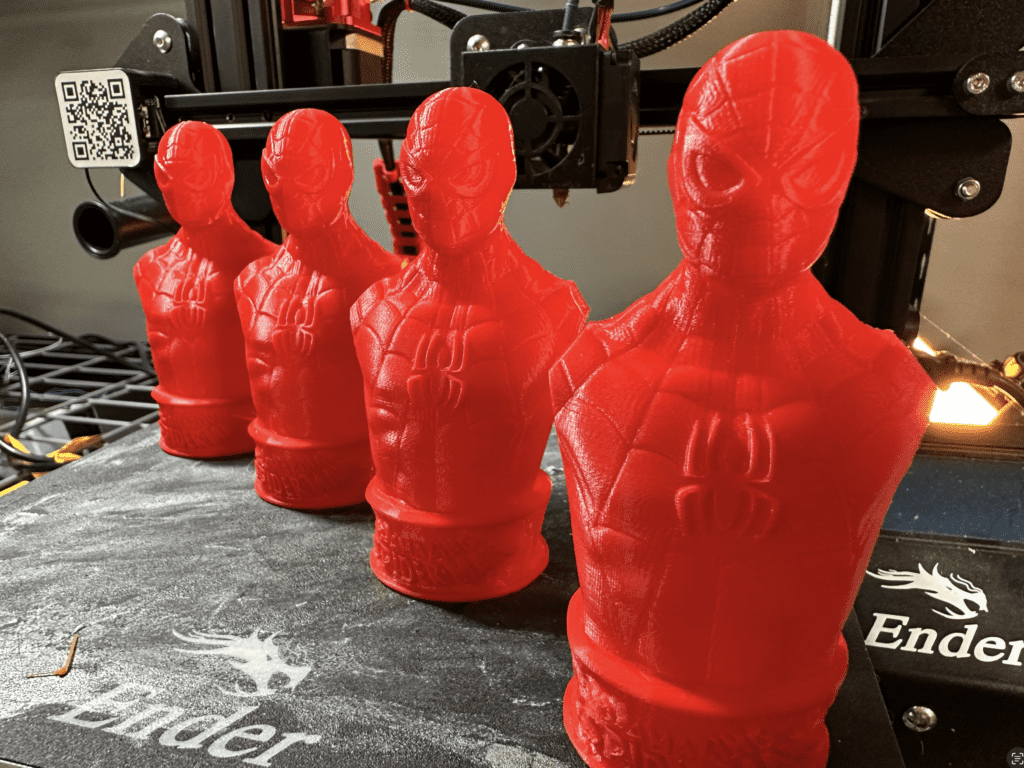
I printed some mini Amazing Spiderman busts at the different layer heights (0.05mm, 0.08mm, 0.1mm, and 0.2mm) on my Creality Ender 3 Pro in PLA to show you real examples and comparisons.
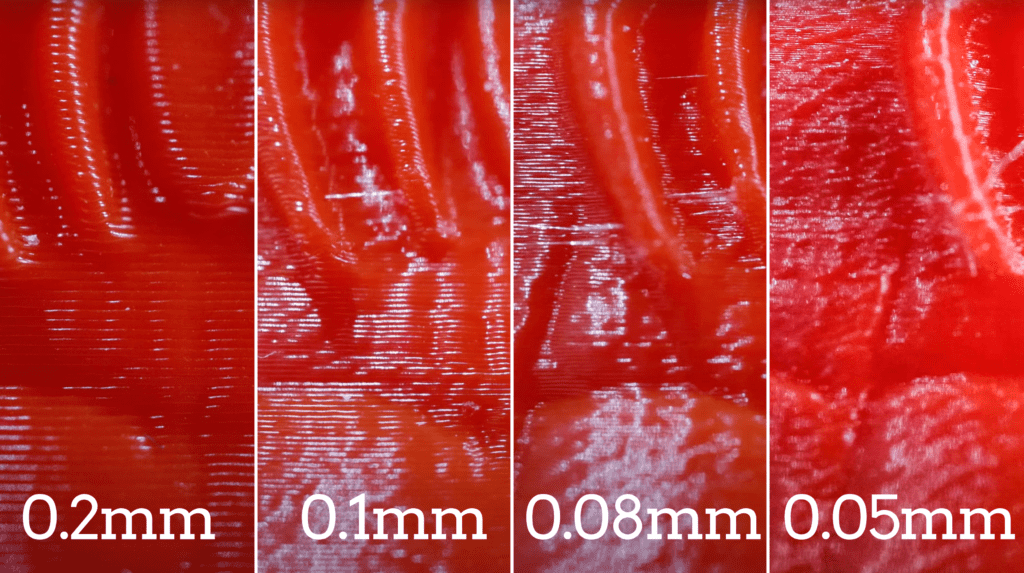
I used my macro camera lens to zoom into the layer lines on these models. You can really see the difference in the contouring and finer details when the layer height is thinner, at 0.08mm and 0.05mm.
For a mind-blowing comparison, the average human hair thickness is only 0.12mm!
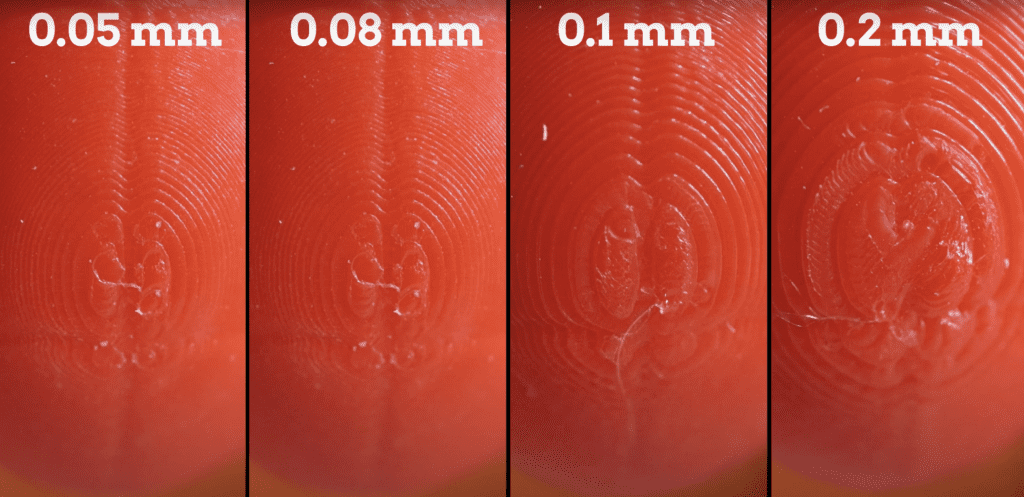
Why the Top Layers of Your Model Look Bad
The layer height has a lot to do with the quality of the final layers of your 3D print.
Your 3D printer tries to get as close as it can to printing the model accurately based on the settings it's given. However, when there are subtle little curves in the model, and the layer height is too thick, you will start to see little plateaus, or stair-stepping, beginning to form. It can be difficult for the printer to get a smooth transition from layer to layer.
This is the case for the mini Amazing Spiderman busts I printed. The top of the head is hard to get a smooth surface, but with the correct layer height, we can usually make those layer lines less noticeable.
Let's have a look at the various layer heights on each one of these models. As you can see in the photos, using a thinner layer height created a more finished surface on the top of the head compared to the thicker layer height.
Again, I used my macro lens to show you exactly how drastically the quality improves as we decrease the layer height on those top layers.
You can also watch the top layer quality change in the video tutorial.
Line Width
The line width in 3D printing is the width of the filament line extruded from the print head to create each layer of the print. Generally, the line width should be set as a percentage of the size of the printer nozzle diameter, and it determines how much material is extruded from the nozzle.
So, in other words, if you want narrow line width, you will want to use a smaller diameter nozzle. If you want a wider line width, use a larger diameter nozzle.
If the line width is not set correctly, the printer may extrude more or less material than intended, resulting in inconsistent layer heights and poor adhesion between layers. By setting the line width as a percentage of the nozzle diameter, the printer can maintain consistent material extrusion, resulting in a more accurate and quality print.
The line width affects the surface finish, the level of detail of the printed object, as well as the strength and durability of the print.
Wide Line Width
A wider line width can create visible ridges and lines on the print's surface and won't capture the fine details of a more complex model.
Using a wider line width is also a bit of a double-edged sword. On the one hand, a wider line of filament can create a stronger print and more surface area for better bonding between layers. But on the other hand, a line that is too wide can result in a weaker print where the layers don't adhere to one another.
Narrow Line Width
A narrower line width can create a smoother surface finish and finer details on more complex models. The printer can produce a more visually appealing print by adjusting the line width based on the desired surface finish.
Keep in mind that if you print a narrow line, you may run into under-extrusion issues that can cause grainy or rough surface finish or layer adhesion problems since there isn't enough material to properly bond the layers of the print.
As with a thinner layer height, a narrow line width will also increase print time.
Wall Line Width
This setting only changes the line width of the walls of the print. You can get even more precise by selecting a wall line width for the outer wall line width as well as the inner wall(s) line width.
The Wall Line Width is set at 0.4mm as the default in Cura.
Outer Wall Line Width
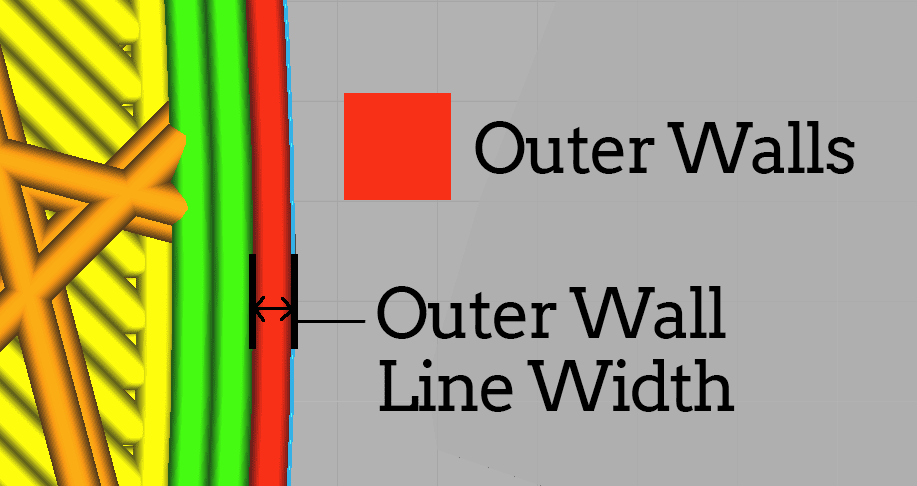
This setting will allow you to control the thickness of the outermost perimeter wall of each layer, which is typically the most visible part of the print. By default, the Outer Wall Line Width is set to 0.4mm, which is the same as the Line Width setting. However, you can adjust this setting to achieve different effects.
Inner Wall Line Width
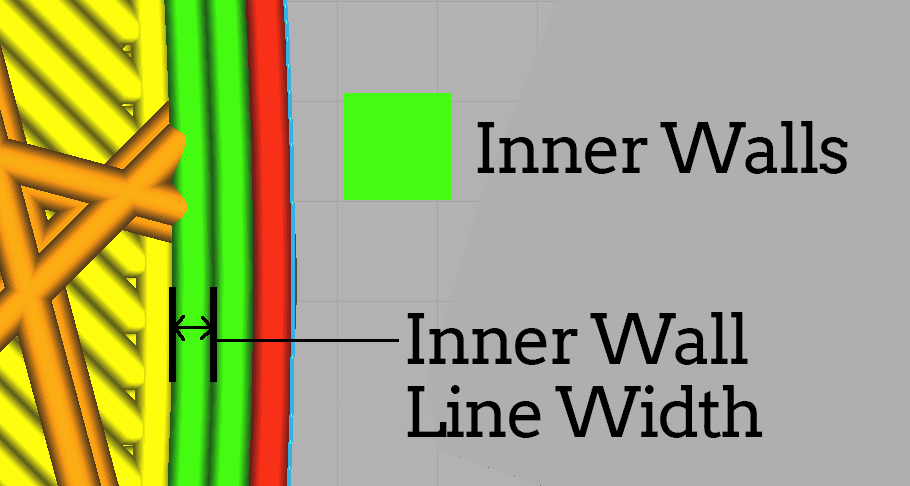
This setting allows you to control the thickness of the interior walls within the print. By default, the Inner Wall Line Width is also set to 0.4mm, but again, you can adjust this setting to achieve different results.
Top-Bottom Line Width
This setting determines the width of the extrusion lines printed on the top and bottom layers of your print. These layers are essential because they help to close off the top and bottom of your print and provide a smooth surface finish. Remember, changing this value will affect both the top and bottom layers, so if you want your bottom layer to be thicker, you will need to adjust the Initial Layer Line Width setting.
Infill Line Width
The topic of infill is too large to fit into this article, so I'm not going to address it much here, but I do have a video tutorial and article all about the infill settings that will cover everything in detail.
For now, you need to know that this setting is in the Quality section of the print settings, and it determines the width of the extrusion lines printed for the infill of your print. Infill refers to the internal support structure of your print and is used to give your print strength and rigidity.
Initial Layer Line Width
As the name implies, the Initial Layer Line Width setting is the width of the extrusion lines printed on the very first layer of your print. You can increase the percentage value to extrude more filament onto the build plate.
This can help with bed adhesion and a solid foundational layer of the print. However, this increases the amount of material being pushed through the nozzle, and again, you want to try to keep the line width of the first layer of a 3D print the same as the nozzle diameter for the best results.
Pro Tip: Decrease the line width of the outer wall slightly to get sharper details on the model.
What Are the Best Quality Settings in Cura?
The short answer is that I cannot tell you exactly what settings will be best for your specific use case. However, I can tell you how I decide on the quality settings I use and for what types of projects.
I create custom Cura profiles for each of my project types. That way, I have them ready to go and only need to make minor adjustments.
I also experiment a lot with my settings. I get flack for it occasionally, but to me, being able to hone my settings is absolutely worth the sacrifice of filament.
Here are some loose guidelines on the settings I use for my 3D print projects with a 0.4mm nozzle.
Highly Detailed/Small Intricate Prints – LH = 0.08mm LW = 0.4mm
Normal Prints – LH = 0.1mm LW = 0.4mm
Functional Prints – LH = 0.2mm LW = 0.4mm
Before every print job, I have a list of settings that I always check before I hit start on my machine to print.
We've covered the importance of layer height, how it can affect the quality of the print, and how to use these settings to get the best print.
We've discussed the significance of line width and why it should match the size of your printer nozzle.
Remember, using a smaller layer height setting for your 3D prints can offer benefits in terms of quality and detail, but it may also require more time, effort, and expertise to produce a successful print.
So keep experimenting and tweaking your settings to get the best prints possible.