Welcome to our deep dive into the world of Ultimaker Cura settings! Today's topic is on the build plate adhesion types and settings, which will help you solve some of your bed adhesion issues and get those prints to stick.
In this guide, we're going to unravel the ins and outs of Cura's build plate adhesion settings to ensure you know exactly how to use these settings to get great print bed adhesion every single time.
If you are brand-new to Ultimaker Cura and found this tutorial, welcome! I highly recommend you starting with How to Use Ultimaker Cura for 3D Printing: A Beginner’s Guide
What is Build Plate Adhesion in 3D Printing?
A vital part of the printing process is getting a 3D printed object to stick to the build plate or printing surface. If you do not achieve good bed adhesion, your print may become loose or shift, resulting in a failed print that pops off the bed. Not cool!
Various techniques can be used to improve build plate adhesion, such as using a heated build plate, adjusting the nozzle to the correct distance from the bed, and adding some kind of adhesive aid for that extra bit of security.
The Types of Build Plate Adhesion
Cura has three settings you can choose from that can improve adhesion. Those are Skirts, Brims & Rafts. All three of these settings are found under “Build Plate Adhesion” in the print settings.
All three are great options, but they all serve different purposes. We will dive into each of these, so you can gain the knowledge to decide which adhesion type to use on each of your 3D printing projects. I will also be giving you the use cases for each of these settings as we go.
PRO TIP
Keep in mind that the build plate adhesion type may change depending on your project. You may even find a favorite that works well for you most of the time, but sometimes the print will demand that you change things up a little. Sometimes one setting will work great for one model but be terrible for another.
Skirt
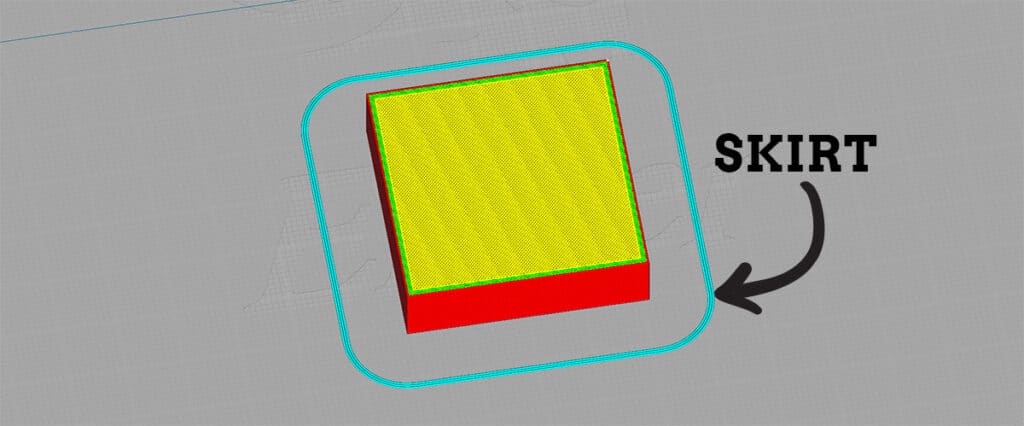
The skirt setting in Cura is a feature that creates a single layer of extruded filament around the perimeter of the print bed before the printer gets to work printing the actual model. This filament layer is only on the first layer and is not connected to your 3d print.
There are two main purposes of a skirt:
- To prime the nozzle and ensure that the filament is flowing properly before it starts working on the first layer of your print.
- An additional check to make sure that your print bed is level and that your nozzle is the correct height from the build plate before the print begins.
The skirt is a sort of test, per se, that is printed at a distance from the model (the skirt doesn't touch the model), and it can be customized in several ways, including the number of lines printed, the distance from the model, and the height of the skirt.
I nearly always use a skirt for every print job as a fail-safe to make sure my bed is level, and the filament is being extruded properly. If things go wrong, it's a great way to correct the issue before the printer starts on the model.
Skirt Line Count
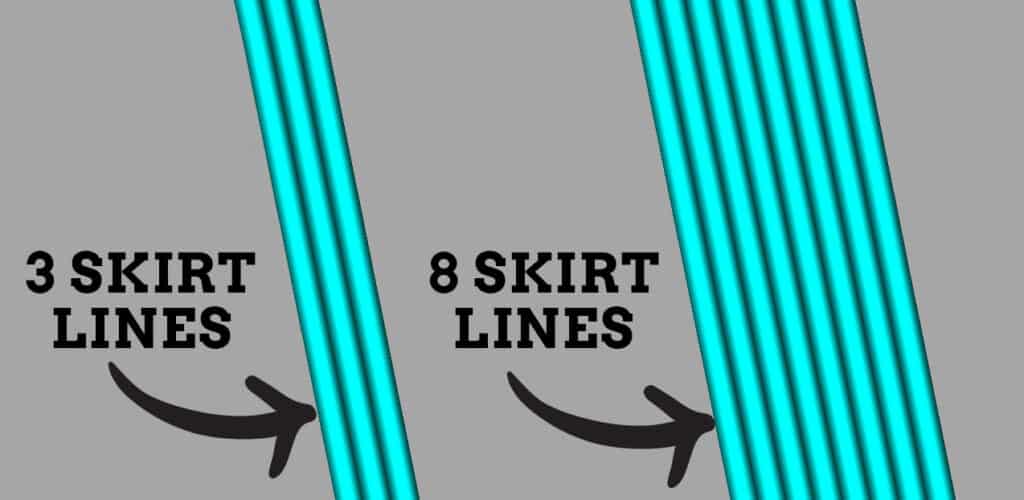
The “Skirt Line Count” setting is just as the name implies – is the number of lines of filament that are printed for the skirt. In other words, it's how many laps the print head takes around the build plate. The skirt line count is set to 3 as default in Cura. However, the number of lines is adjustable and can be increased.
Adding more lines to the skirt line count can also increase printing time and material usage. So, balancing the benefits and costs of adjusting this setting according to your specific needs is important.
PRO TIP
I typically like to set the skirt line count to do 3-5 lines, so I can watch to see if my bed is properly leveled. If the bed level is slightly off, I can make adjustments on the fly while the printer prints to get a fine-tuned level for my first layer.
Skirt Distance
The “Skirt Distance” setting determines the horizontal distance between the skirt and the first layer of the print. The skirt distance is set to 6.0 mm as default in Cura, but this can be adjusted based on your needs.
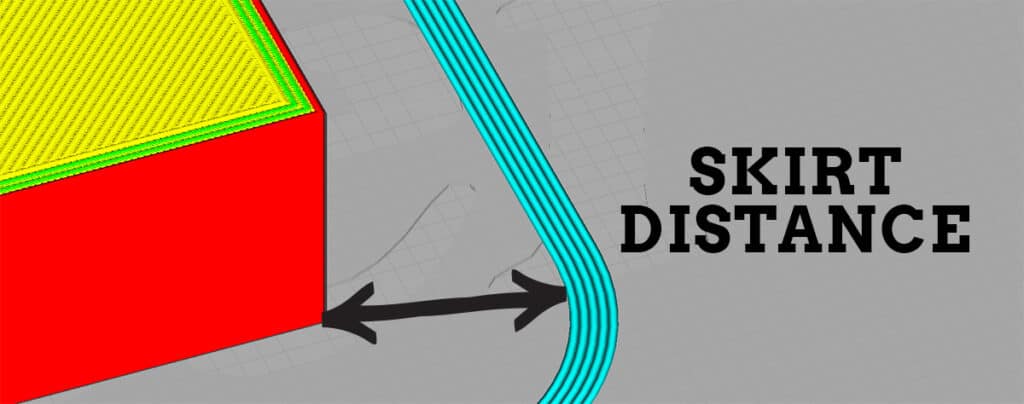
If you set your skirt distance farther away from the print, you will have a better opportunity to adjust the level of the bed on the fly. It will give you more time to make any necessary adjustments without having to stop the printer.
Skirt/Brim Minimum Length
The “Skirt/Brim Minimum Length” setting affects both skirts and brims, depending on what you have selected. It is the minimum length that the skirt or brim lines should be. In other words, it tells Cura that a minimum length of material should be printed.
If the combined length of all the skirt or brim lines is less than this minimum length, additional lines will be added until the minimum length is reached. It is important to note that this minimum length will be ignored if the line count is set to 0.
You can see exactly what happens when I change the minimum length settings in the video tutorial.
Brim
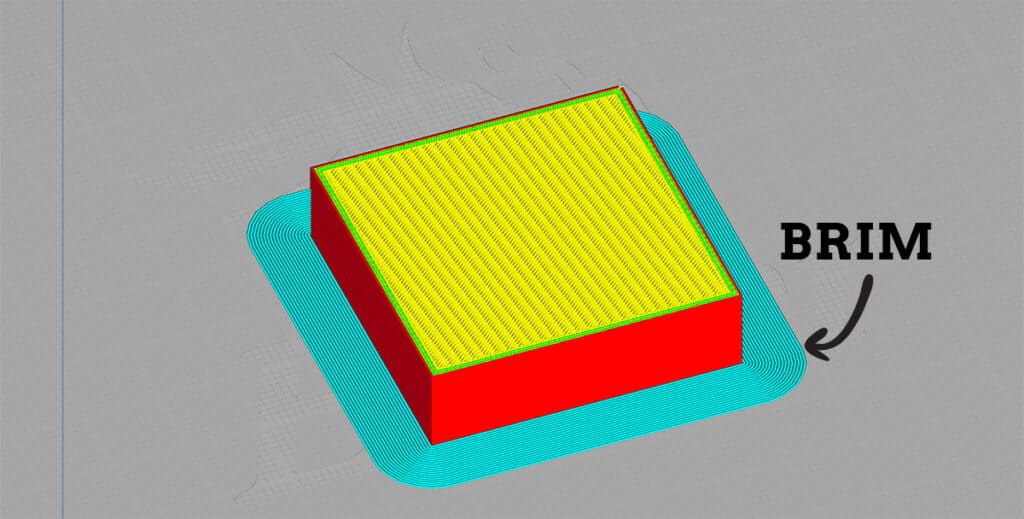
A brim differs from a skirt in that it directly attaches to your 3D print. This setting is often used when a print needs extra adhesion by providing more surface area for the first print layer to stick to to the build plate.
Brim Width and Brim Line Count
The “Brim Width” and the “Brim Line Count” are two settings tied to one another and are essentially one and the same. When you change one of the settings, the other also changes automatically.
You can adjust the brim by width and choose how many millimeters you want the brim to advance outward from the print.
Or you can choose to use the brim line count to determine how many lines or rings you want to be printed around your model.
The higher the line count number, the greater the surface area your initial layer will have, which increases the surface area to ensure a successful print.
See how I demonstrate changing the brim width and brim line count and how these two settings work together.
Brim Distance
The “Brim Distance” setting controls the distance between the brim and the actual print.
This setting boggles my mind a bit because the purpose of the brim is to attach to the print. If you change the distance to anything greater than zero, then the brim essentially becomes a skirt and has no effect on the adhesion of your model. But I digress.
Needless to say, I always keep this setting at the default of 0mm.
Brim Only on Outside
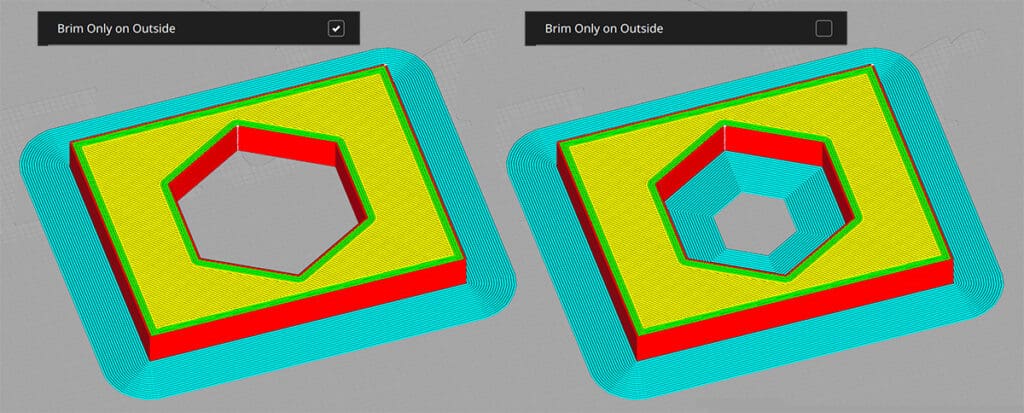
The “Brim Only on Outside” setting in Cura means that the brim will only be printed on the outside of the model, instead of all around it. This helps to reduce the amount of brim that needs to be removed after printing. However, this setting still provides good bed adhesion for the model, so it doesn't significantly reduce the quality of the print.
Brim Replaces Support
When the “Brim Replaces Support” option is enabled, the 3D printer will print a brim around the model instead of support, even if the support is needed in that area. This means that certain areas of the first layer of support structures will be replaced by a brim.
Leaving the brim replaces support box unchecked will allow the brim also to provide more surface area and reinforce support structures rather than replacing them.
I personally don't use this setting and leave it disabled. I like that the brim wraps around the supports, which gives the supports better adhesion to the bed and minimizes failed supports.
In the video tutorial, I showed the differences between enabling and disabling the brim replaces support setting.
Raft
A basic explanation of a raft is that it is a print adhesion technique used to ensure the model sticks better to the build plate. It is essentially a platform that adheres directly to the build plate that the model sits on top of and is several layers thick.
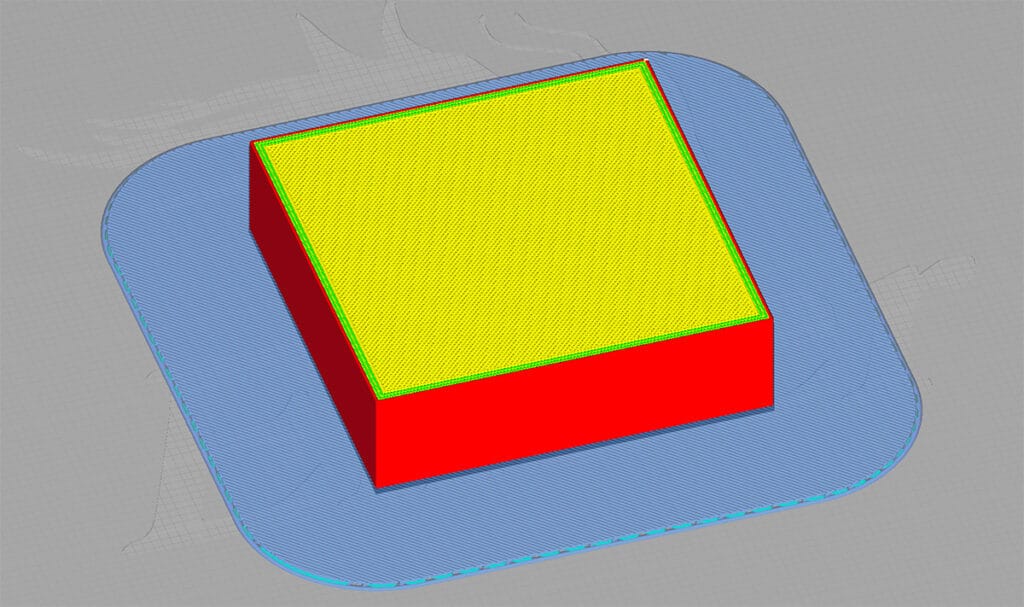
Rafts are particularly useful in getting better build plate adhesion because the initial layer is adhering to the raft, which is filament, rather than directly to the print bed.
If you have a larger print that could be prone to warping, using a raft is a great way to prevent warping because the print is no longer cooling directly on the print bed.
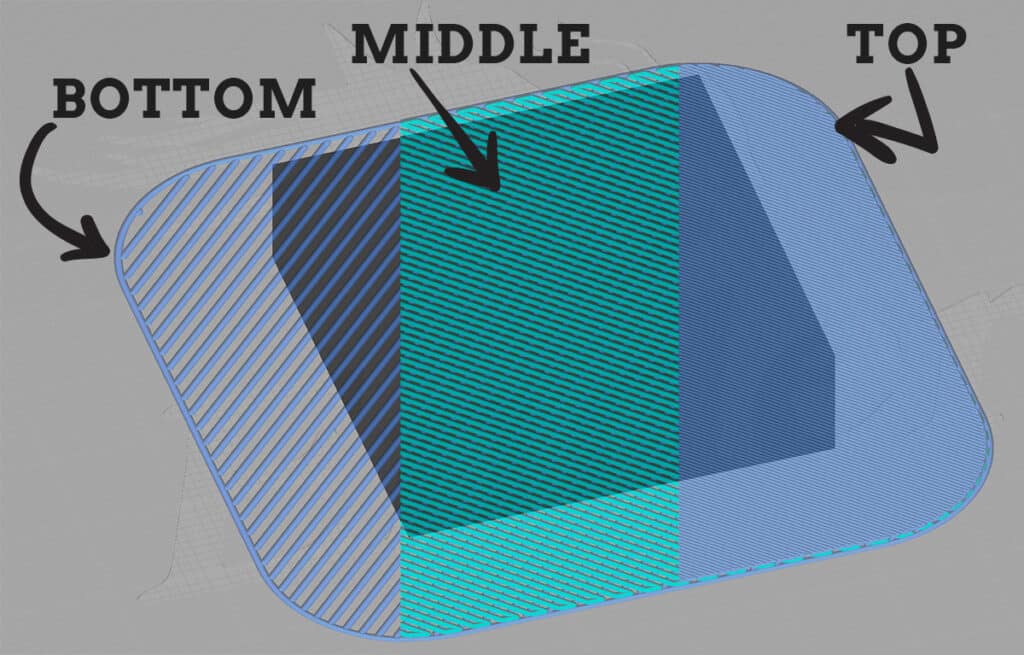
The raft is divided into three parts:
- Top layers
- Middle layers
- Base layers.
The raft settings in Cura allow a lot of adjustment and flexibility. It is super useful to know raft settings work and how to use them as a tool to ensure the print is successful.
Raft Extra Margin
The “Raft Extra Margin” setting controls the amount of additional space, or margin, added around the perimeter of the raft that is printed underneath the model. It determines how much the raft will extend beyond the outer wall of the 3D print to create a perimeter all the way around the model.
Increasing the margin around the print will increase the surface area for the raft to adhere to the build plate, making for a more secure raft.
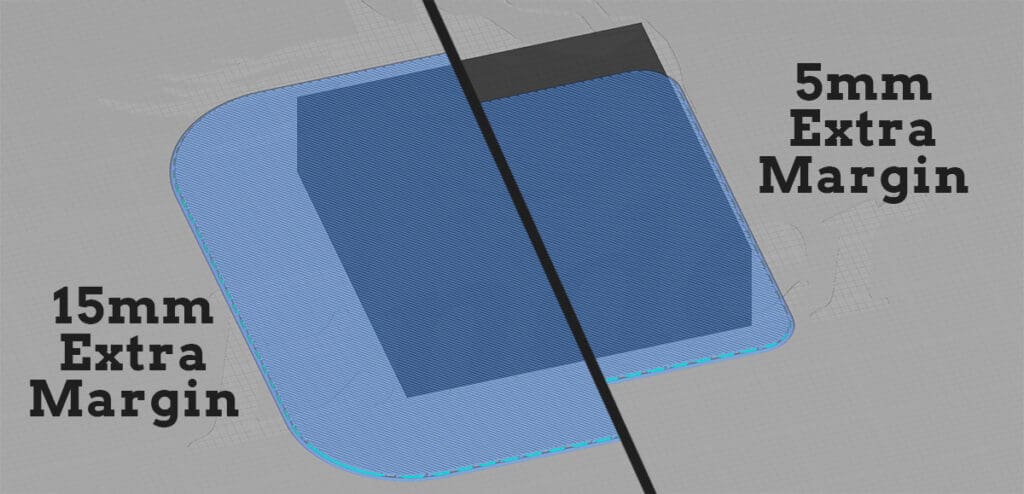
However, the raft will take up more material and more space on the print bed, leaving less room for your print. This doesn't matter much for small models, but it is something to consider if your model is large and requires more space.
Decreasing the raft margin will use less material for the raft, leaving more room for your print on the print bed. However, this may weaken the raft and lead to bed adhesion problems.
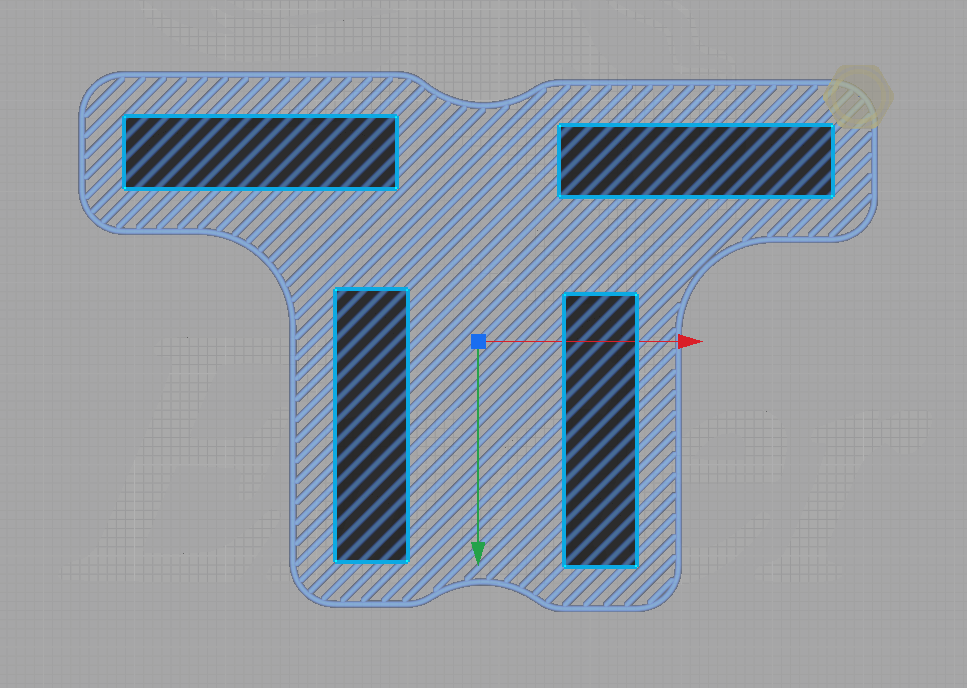
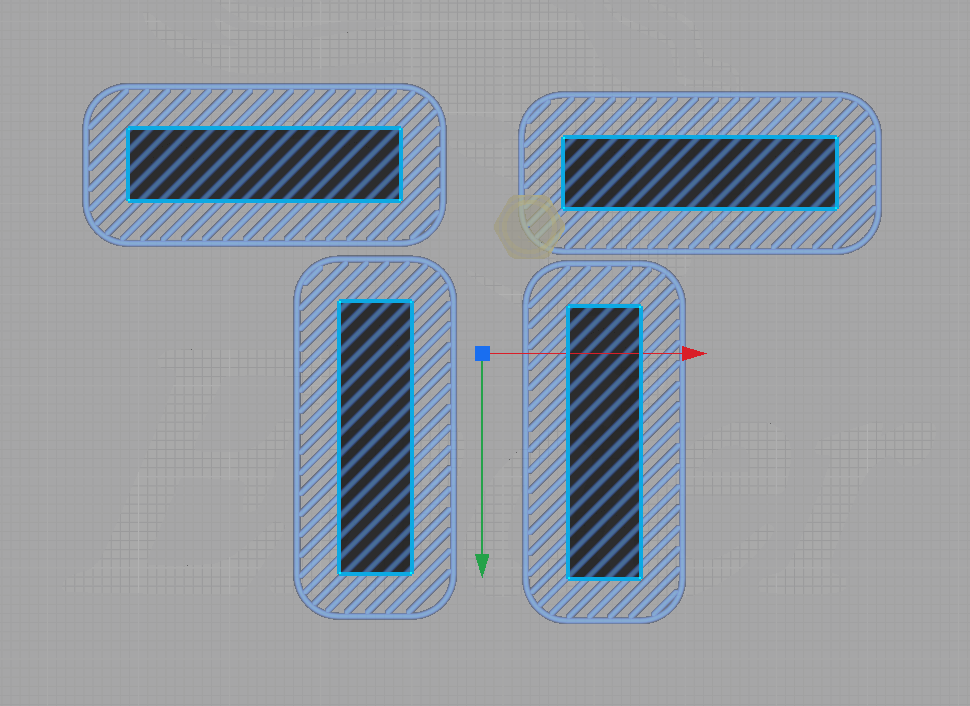
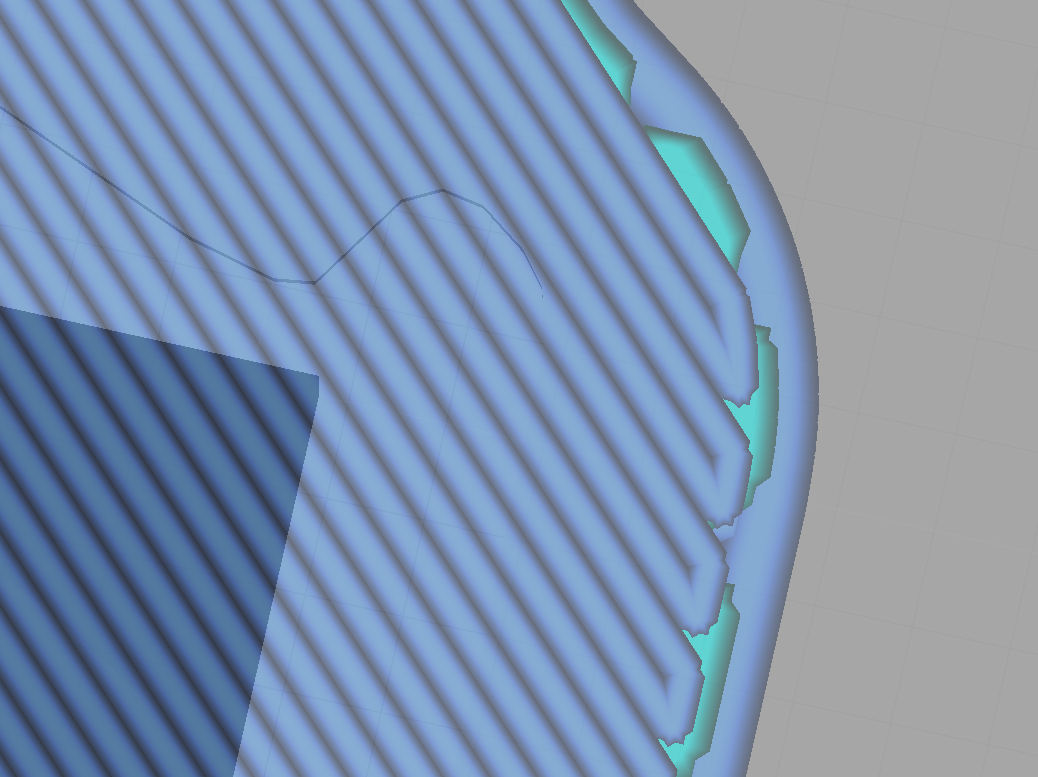
Raft Smoothing
Essentially, when the “Raft Smoothing” setting is enabled, it smooths and rounds the corners of the raft. Also, if you have multiple objects on your build plate, using the smoothing setting allows you to have one raft to connect all of the objects you have on the print bed.
Personally, I always recommend making one raft for all of your objects because the surface area of the raft is much larger and will greatly improve bed adhesion.
I demo how the raft smoothing setting works with multiple objects on the print bed.
Tip:
Fewer holes if you have multiple objects or touch points on the base it will connect them to make less gaps.
Setting at 10.0 mm example
Setting at 0mm example
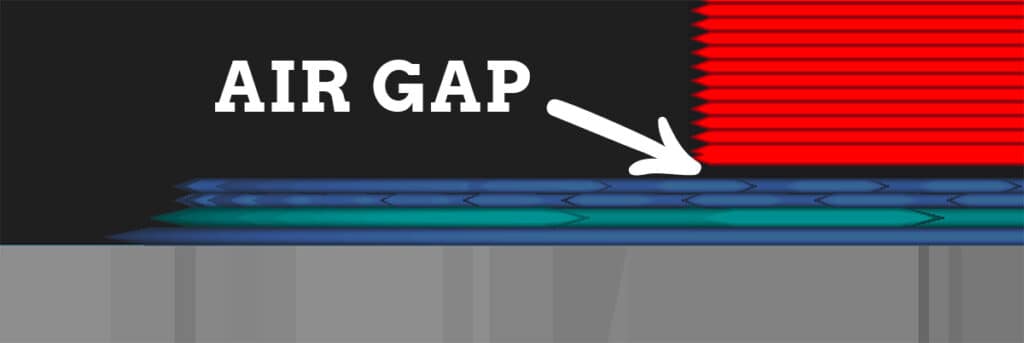
Raft Air Gap
The “Raft Air Gap” setting in Cura is the gap between the raft and the first layer of the model being printed. This setting only raises the first layer of the model by the specified amount, which effectively weakens the bond between the raft layer and the model.
Increasing the raft air gap will make it much easier to remove the printed object from the raft after printing.
You can reduce the air gap to 0.12mm, but the less air gap you have, the raft will adhere too much to the first layer of your print and become a real pain to remove.
It is important to set the air gap correctly to avoid poor adhesion or too much adhesion.
In the video, I explain the air gap using a side view of the raft layers and show you example prints.
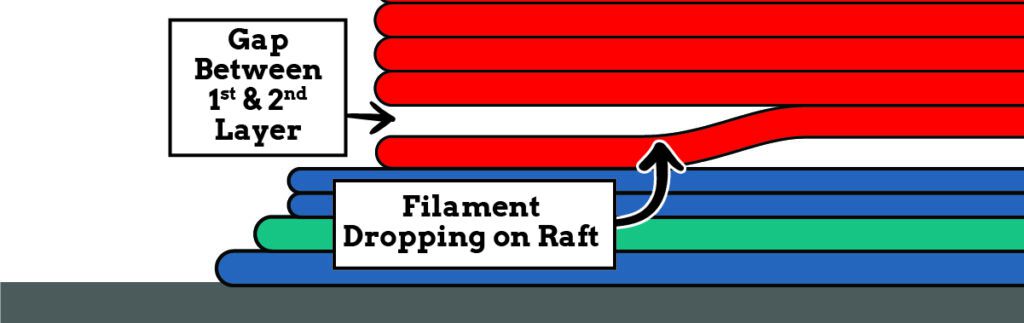
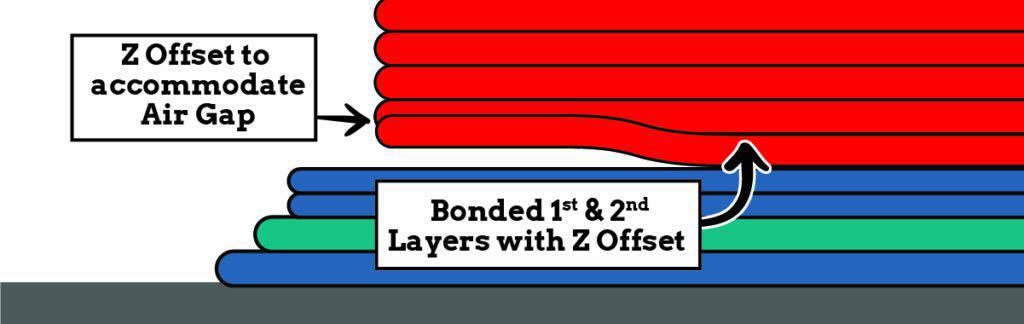
Initial Layer Z Overlap
“Initial Layer Z Overlap” is a vital setting when it comes to the quality and bonding of your first two layers. I have explained the “Air Gap” setting which allows a space from your raft and your first layer. That gap allows the filament to drop down onto your raft. This is where the Initial layer z offset comes into play. Do to that drop your first layer is not in the exact position that the 3d printer printed the first layer. It's actually lower. So we need to tell the printer to move down on the second layer to accommodate for that slight drop of the first layer. So the second layer doesn’t print where it is supposed to print, it moves it down slightly to allow the first and second layer to bond to each other. Without this setting you could get poor adhesion to your first and second layer due to that distance the first layer dropped down onto the raft.
No Initial Layer Z-Offset
With a Initial Layer Z-Offset
Cura will automatically accommodate for this by creating your Initial Layer Z Overlap by dropping the start of the second layer by half of what your Air Gap is. I’ve found that this is a good amount for your offset.
So if your air gap is set to 0.2mm your Initial Layer Z Overlap would be set to 0.1mm.
“Initial Layer Z Overlap” is a setting in Cura that allows the first and second layer of the model to overlap in the Z direction, which compensates for the filament lost in the air gap. The amount of overlap can be adjusted by either millimeters or as a percentage of the layer height. This overlap helps to improve the adhesion of the first layer to the build plate and creates a smooth base for subsequent layers.
Read: Ultimaker Cura Quality Settings 101: Layer Height and Line Width Settings Explained
When you enable this setting, all models above the first layer will be shifted down by the specified amount. This means that the second layer will start printing on top of the first layer, creating a slight overlap that helps to hold the layers together. The overlap also ensures that there are no gaps or holes between the first and second layers, which can lead to a weak foundation for the rest of the print.
It's worth noting that the amount of Initial Layer Z Overlap you need may vary depending on the type of filament you are using, the size and shape of the model, and other factors. As a general guideline, a 20% overlap is a good starting point for most prints, but you may need to experiment with different values to find the optimal setting for your specific print.
Simple Terms with Air Gap and Initial Layer Z Overlap
If you have your air gap set to 3mm, it has a large gap, and the filament will lay down on the raft. So the next layer there would be a slight gap so this compensates for the gap to ensure the second layer adheres to the first layer well.
Now we will talk more about the actual layers of the raft and how to make adjustments to those settings. Remember, the raft consists of 3 layers – top layers, middle layers, and bottom layers.
Raft Top Layers
The “Raft Top Layers” setting is the number of top layers printed on top of the second layer of the raft. While the second layer has gaps, the top layers fill the layer fully and provide a smooth surface for the first layer of the model to sit on top of.
As a general rule of thumb, increasing the number of top layers can result in an even smoother surface. If you're getting rough top layers, you can experiment to see if adding another layer will make the surface smoother.
I recommend always using at least two top layers because the middle layers of the raft have gaps where the filament may drop down into. Having a minimum of two top layers allows the first top layer to have some droopage (yep, that's a word) into the middle layer gaps and makes for a smoother layer for the second top layer to print on top of due to the potential droopage of the first top layer printed.
It's a bit confusing, so I show you how these top layers print on top of the second layer of the raft.
Raft Top Layer Thickness
In Cura, the “Raft Top Layer Thickness” is one of the print settings that can be adjusted to improve your entire 3D printing process and helps with bed adhesion.
Here are some of the advantages of adjusting the top layer thickness of the raft:
- Provides a stronger raft for the foundation of your 3D print
- Increases the strength and smoothness of the first layer of the printed object
- Higher quality prints
If you are using a .04 nozzle, I recommend a 0.2mm layer height.
Raft Top Line Width
The “Raft Top Line Width” is the width, or how wide, the lines are printed on the top layer of the raft.
The recommended line width should be close to the size of your nozzle for the best results. If you have a 0.4mm nozzle, set this to 0.4mm line width.
Reference:
I talked about this in the wall thickness article:
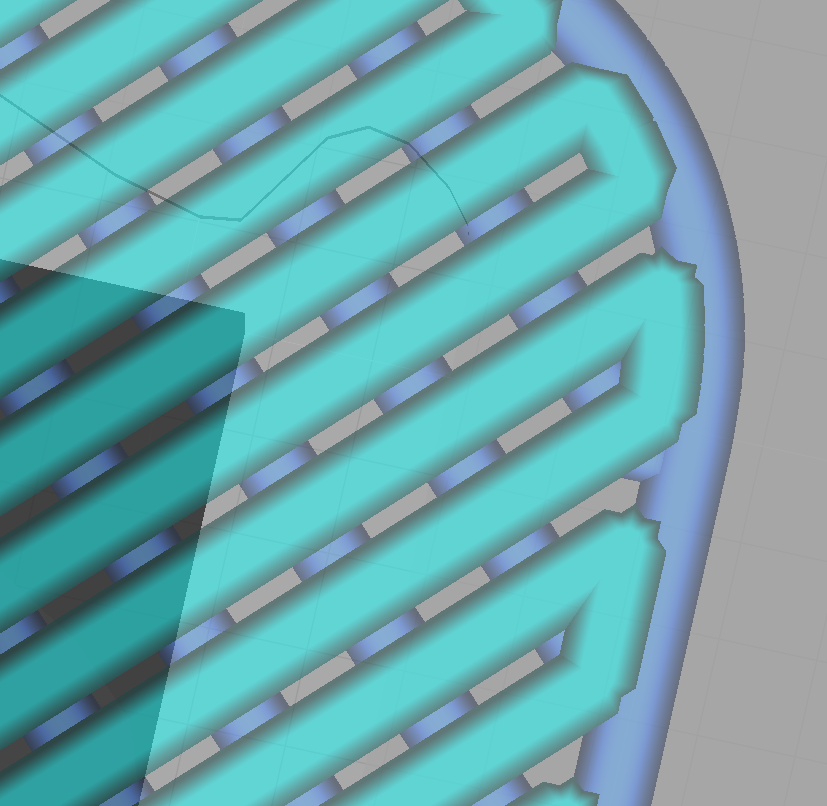
Raft Top Spacing
The “Raft Top Spacing” setting determines the distance between the lines on the top surface of the raft and how much filament is extruded in the spaces between the lines.
The spacing should be equal to the line width so that the surface is solid with no gaps. In other words, the top layer of the raft will be a solid surface with no gaps in between the lines, which can improve the adhesion of the model to the raft and improve print quality.
Set to .4mm using a .4 nozzle
Set to a 0.7 top spacing. Notice the gaps will not ensure a smooth top layer. There should be no gaps on .

Middle Raft Layers
The layer or layers that are sandwiched between the top layers and the base layer of the raft. These settings determine the main thickness of the raft, so let's explore how to customize these settings.
Raft Middle Layers
The “Raft Middle Layers” setting in Cura is the number of layers between the base and surface, top layers, of the raft. It acts as a transition between the bottom and top part of the raft. This will allow the raft to need fewer top layers.
Increasing the number of layers creates a thicker and sturdier raft, while decreasing it reduces the number of middle layers and makes the raft thinner.
You can also set the middle layers to zero and have only a base and top layer on the raft if you were to need it. But keep in mind, if you have no middle layer, you would have to have additional layers for the top raft layers.
I always go with just one single middle layer because I don't want to waste a ton of filament on my raft.
Raft Middle Thickness
The “Raft Middle Thickness” setting is simply how thick the layer of filament will lay down. Cura, by default sets this at a 0.3mm thickness, which makes this slightly thicker than the top layer to allow for a thicker layer to get more adequate bed adhesion. In general, the middle layer should be thicker than the base and top layers.
Raft Middle Line Width
The “Raft Middle Line Width” setting is the same as the “Raft Top Line Width” with the exception that, by default, Cura sets the middle line width a bit wider by a multiplier of two to allow a maximum width for better adhesion.
In the video, for example, my “Raft Top Line Width” is set at 0.4mm, so the “Raft Middle Line Width” would be multiplied by two to give me 0.8mm.
Raft Middle Spacing
The “Raft Middle Spacing” setting determines the gaps between each line of the middle layer of the raft.
Remember, the larger the gaps between the lines means that you will also have to increase your “Raft Top Layer” count because you will get more droopage of the top layers into these gaps of the middle layer.
I really like to keep this simple and leave the default at 1mm since it's a tight gap that will get good results even if I only use two top layers.
Notice the gaps in the picture. You don’t want the gaps completely closed.
Raft Base Layers
The base layer settings are the most important layers of the raft since they adhere directly to the build plate. You will need to get good “squish” of the filament on the first base layer to prevent adhesion issues and failed prints. This is especially true if you don’t have a heated bed.
In general, you will want a thick and heavy layer for your base layers so you can get the best adhesion possible.
Raft Base Thickness
The “Raft Base Thickness” setting in Cura sets the layer thickness of the first layer of the raft that adheres directly on the build platform.
If you're having issues with getting things to stick to the bed, you can crank this number up a little higher. But I've had success leaving it at the default 0.24mm because it gives me enough “squish” to get things sticking to the print bed really well.
Raft Base Line Width
The “Raft Base Line Width” setting in Cura, just like all the other line width settings, is the width of the lines that make up the base layer of a raft.
The line width of the base layer will be your nozzle size multiplied by two. In my case, again, 0.4mm would be doubled to 0.8mm – this is the same as the middle layer line width. This pushes out a lot more filament to give you nice wide lines and a really good foundation for your raft.
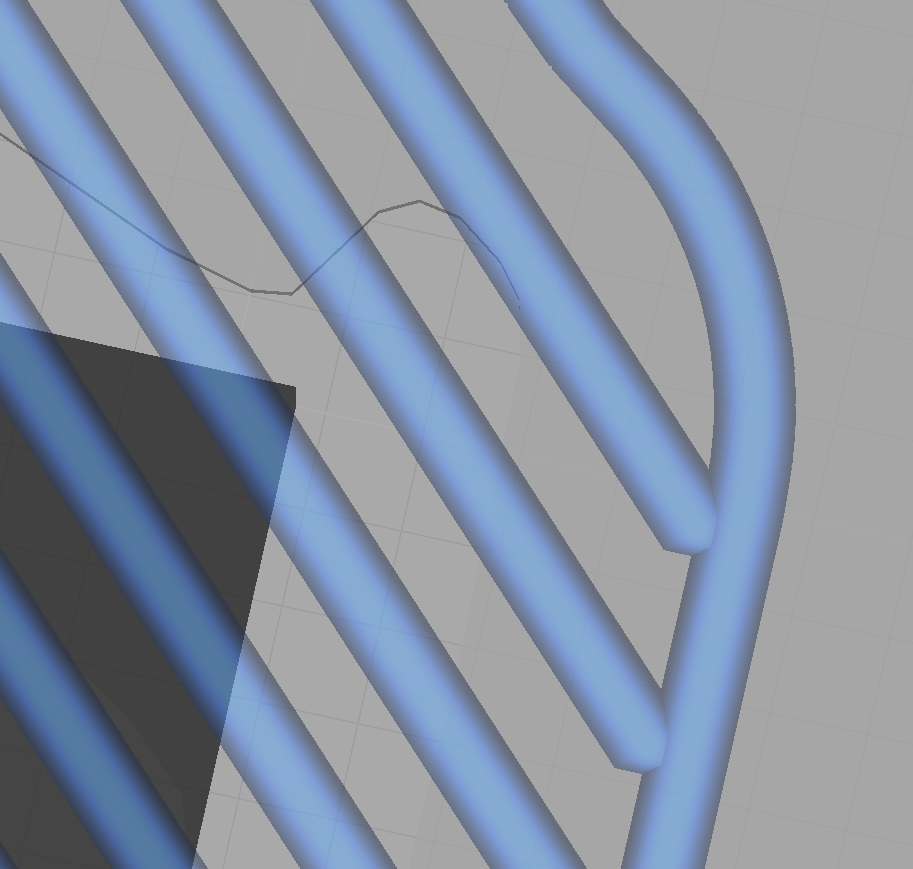
Raft Base Line Spacing
The “Raft Base Line Spacing” setting works the same way as the middle and top line spacing and controls the space between the lines of the base layer of the raft.
If you increase the line spacing on the base layer, you may need more than one middle layer, so I usually keep this set at the default of 1.6mm. This way, I get a lot more of that filament laying down and sticking nicely to the print bed.
That said, I don't recommend going to like 0.5mm or something low like that because that will lay a flat sheet of material on the bed and make getting the raft off of the bed really difficult.
The larger the line gaps, the easier it is to remove the raft from the build plate. Just don't go too large.
Notice the larger gaps between layers that allow an area to allow the middle raft layer to lay onto.
Raft Print Speed
The “Raft Print Speed” is calculated by taking half of what your initial print speed setting. This setting tells the printer how fast to print the raft.
I do not recommend setting the print speed over 25 mm/s. So if you are printing really fast, say 100 mm/s, that would put your raft print speed at 50 mm/s. In this case, I would adjust this back down to 25 mm/s.
We can adjust the print speed for each of the layers one by one, so let's take a look at how that works.
Raft Top Print Speed
The printing speed of your top layers. I like to set this to the same speed that my initial model speed is set to.
Raft Middle Print Speed
This is set by default to 75% slower than the set raft print speed to allow better adhesion to the base layer. I stick with the default setting.
Raft Base Print Speed
This is also set to 75% slower than the raft print speed to allow better adhesion to the bed, but I like to adjust it down a tad more.
Typically, I will print at 15 mm/s, and I get great results. No matter what the other print speed setting are, I always want that very first base layer to go as slowly as possible.
The reason for this is that we are pushing out a lot of filament for the very first base layer, and we want to give the printer plenty of time to do that properly. If the speed is too fast, the printer may not be able to keep up and extrude the filament fast enough.
Yes, it will take a little more time, but in my opinion, it's worth it.
Raft Fan Speed
Let's take a second to review what a raft's main functions are. It's all about getting the best adhesion to the build plate that you can!
Now that we have that out of the way, I'm not a fan (pun intended) of using the fan settings for rafts. My reasoning is that the purpose of the fan is to cool the filament, and I don't want to do that on my raft. I want the filament for my raft to stay nice and hot to ooze on there to get the perfect adhesion to the build plate and great bonding between the layers of the raft.
But if you want to know how these settings work, here you go.
The main raft fan speed setting is linked to the top layer, middle layer, and base layer fan speed settings. If you change the setting in this section, it will automatically change it for all three layer types.
In my opinion, this is a terrible thing to be linked together. Here are my suggestions when it comes to fan speeds on your rafts.
Raft Top Fan Speed
This should be set to 100% this will ensure your top layer has been properly cooled and allows the first layer of your model to not adhere to the raft.
Raft Middle Fan Speed
I set this at 50% to allow the filament to start cooling down slowly and adhere to the base layer well.
Raft Base Fan Speed
This needs to be set to Zero! Having no fan on for your first layer allows the filament to better adhere to the bed. You want it to stay hot and cool naturally to the temperature of the build plate. This will prevent warping or peeling off the build plate.
Conclusion
Overall, Cura is a great 3D printing software that offers a variety of build plate adhesion settings to help ensure a successful print. By utilizing these bed adhesion options in Cura, you can achieve better adhesion, reduce warping, and ultimately improve the quality of your 3D prints.
It may take some practice to get an idea of what build plate adhesion type will work best for your 3D model.
Skirts can be used to prime the nozzle and check bed leveling, while using a brim will provide a larger base for the model to stick to.
When printing complex or delicate models, rafts can be a great option to create a stable foundation.
It's important to experiment with different settings and find what works best for your specific printer and model.