Here we are back in the wonderful world of Ultimaker Cura settings. Today we are talking about the wall settings and how to get the ideal wall thickness for your 3D-printed models.
If you’re aiming for 3D prints with excellent strength, durability, and overall quality, then you’re in the right place.
Wall thickness is an important setting to adjust in 3D printing because it directly impacts how well your final 3D printed model will turn out.
We’ll discuss what wall thickness is, why it matters, the speed and its impact, common issues people have, tips for finding your optimum wall thickness, and then how to adjust the wall thickness in Cura.
We’ll cover some advanced techniques to make your 3D prints look their best, and I’ll be sharing real printed examples of various wall thicknesses. ! So let’s get started!
What Is Wall Thickness in 3D Printing and Why Does It Matter?
Wall thickness in 3D printing is a measure of how thick the outer walls of a 3D print are. It’s important to consider wall thickness because it affects the structural integrity, accuracy, and filament usage.
Structural Integrity
In the most basic sense, how strong is your print going to be and how well will it hold up?
Structurally, thicker walls make a print stronger and more resilient. While thinner walls could be prone to breaking or warping.
Accuracy
Accuracy means how close does the resulting 3D print match the 3D model?
If your walls are too thin you could lose some of the resolution of your print and it won’t be an accurate representation of the intended model.
If the walls are too thick you could end up with blobs and zits on the surface of your print and the finish won’t turn out as well as you’d hoped.
Material Usage
If we think about it logically, it makes sense that if we make our walls super thick, we will be using more filament.
It’s true that making your walls a bit thinner will use less filament, saving you money in the long run, but make sure you find a good thickness that yields a quality print.
Finding the right balance between thin and thick walls is key to getting the most out of your 3D printing.
The Impact of Speed on Wall Thickness in 3D Printing
When it comes to 3D printing, the speed of your prints can have a major impact on the wall thickness of your prints.
If you only have one wall line count, then the printer only has to print one wall per layer.
However, if you have a higher wall line count, like six, then the printer has to print six walls before it can move on to the next layer.
This extra time can add up quickly, so it’s important to find a balance between strong prints and fast prints.
A good rule of thumb is to aim for a wall line count of three and a printing time of 2-3 hours. This way, you can ensure that your prints are both strong and speedy!
Common Wall Thickness Issues in 3D Printing
The 3D printing process can be complex, and one area that can cause problems is the wall thickness of the model.
Wall thickness that is too thin can lead to gaps between walls, poor finish, layer shifting, and weak adhesion.
Wall thickness that is too thick can lead to visible layer lines, rough surface finish, and layer adhesion issues.
Finding the right wall thickness for a 3D print is a tricky thing, and it’s important to remember that each 3D printer and model is different.
Why Does My Print Have Gaps?
If you are seeing gaps in your prints then, you may not have thick enough walls and you may need to increase the wall thickness a tad.
Why Does My Finish Look Rough?
If you’ve noticed that your finish looks a bit rougher than expected, the culprit may be a thicker wall. When walls are thicker than the model requires, the printer can end up pushing out more filament, resulting in an inconsistent, rough surface.
Troubleshooting Layer Shifting
Layer shifting is a common issue that can affect the quality of your 3D prints. If you are experiencing a shift in your layers, the first thing you want to do is check your 3D printer and make sure that all of the belts are properly tightened. If the belts are tight, it could be caused by a setting or the wall thickness of the print
If you have a thin wall, it can be difficult for the layers to align properly.
On the other hand, if your walls are too thick, this can also create layer shifting issues because the layers aren’t able to bond together properly.
Why Does My Print Have So Many Layer Lines?
If you’re printing walls with a thicker line width, you may see more visible layer lines. This can also lead to poor adhesion between layers, which can cause them to split apart and cause gaps.
Bad adhesion between layers can also happen if your walls are too thin. Make sure you set the wall count to more than one or two layers. This will help ensure that the layers bond together properly.
Tips to Choose the Perfect Wall Thickness
Deciding how thick to make your walls depends a lot on the project. You need to consider things like the model, the type of material you are using, as well as your other print settings.
Size of Model
Printing a successful 3D model comes down to more than just the design; the wall thickness of the model itself is an important factor to consider.
When selecting a wall thickness for your model, take into account its size. Larger models will require a thicker wall thickness for stability and strength.
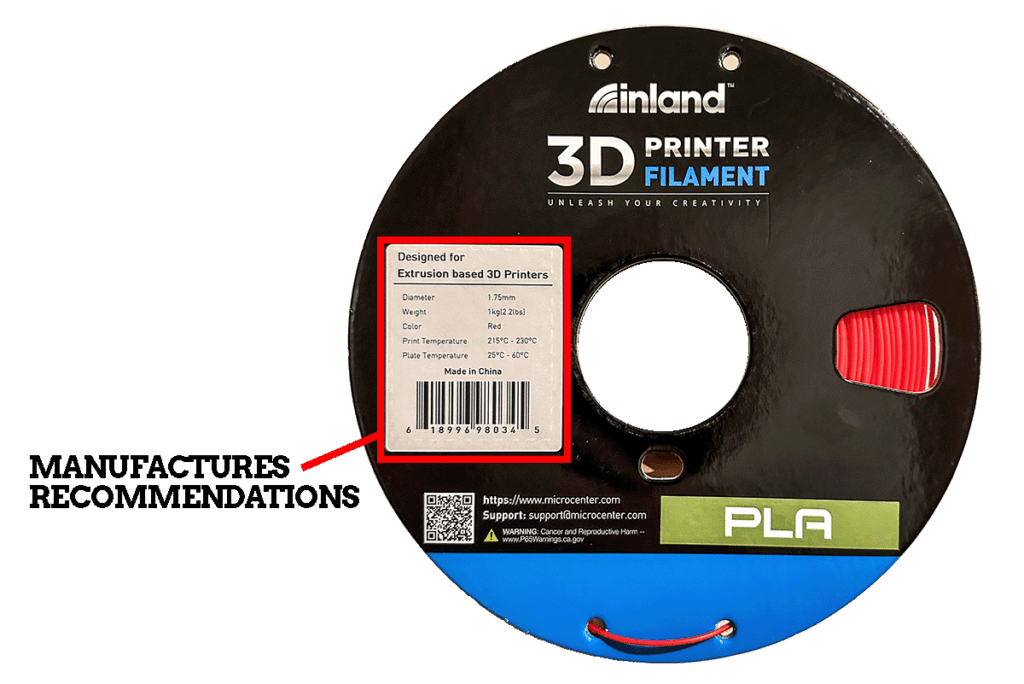
Printing Material
Make sure to look up the specific filament you’re using to determine what thickness is recommended.
If you don’t pay attention to the filament manufacturer’s guidelines, you may get some failed prints. So do some investigating and find what wall thickness is recommended for the material you choose to use.
Print Settings
The other print settings that you’ve already set or that were set by default in your print profile, will have an effect on your wall settings.
The “wall line width” setting which is found in the Quality settings panel determines the default wall thickness. The wall line width is calculated as a multiple of your nozzle size.
Read: Quality Settings: Layer Height and Line-Width Explained
I print mostly on Ender 3 FDM 3D printers and use a standard 0.4mm nozzle for the majority of my projects. This means that my wall thickness will always be a multiple of 0.4mm.
Test Prints: A Necessary Step
To find the best wall thickness for your project, you will need to test. Don’t trust a random number that someone gives you.
I can tell you that the minimum wall thickness for 3D printing in general is X random number. Or I can tell you to just set 3 wall lines and you’ll be good to go. Not really. What works for me may not work at all for you.
Of course, you can use those numbers as a guideline for your testing, but don’t just assume that the print will come out right.
If you want to achieve clean, smooth prints, test prints are a must and can make a night and day difference in your 3D printing process.
I realize this is an unpopular tip, but it is well worth the effort and small bit of sacrificed filament.
Doing test prints can help you better understand how to hone in the slicer settings and find the minimum wall thickness that works to get the best 3D prints for your printer.
Balancing Your Print Settings
When 3D printing, it’s important to remember that one setting can affect many others. For example, line width, wall width, wall thickness are affected by layer height and speed and infill.
To ensure a strong print, consider printing fewer layers but with a denser infill. This will create a stronger model than if you just printed with more layers at a lower infill.
Depending on the type of 3D print you want, you may prioritize either quality or durability.
Do you need something done quickly, or do you need something that will last?
It can be tricky to find the ideal wall thickness, but with a bit of testing, you’ll be able to find the best option for you.
Remember, a thick wall isn’t always the answer – it’s all about balance.
Adjusting the Wall Settings in Cura
Now that we’ve talked all about the common issues and some tips for choosing the right wall thickness, let’s get into which wall settings we need to pay attention to in Cura.
Wall Thickness
The “Wall Thickness” setting is measured in millimeters. You will want to adjust this setting if you need an exact measurement.
Changing the wall thickness measurement will automatically change the “wall line count” number.
The wall thickness is also directly affected by the “line width” setting. For example, if I have the “line width” set to 0.4 mm then set my “wall thickness” to 0.8 mm, this means that my “wall line count” will be 2.
It is up to you which number you use. I typically go with the “wall line count” unless I need to be super specific about a measurement of my print.
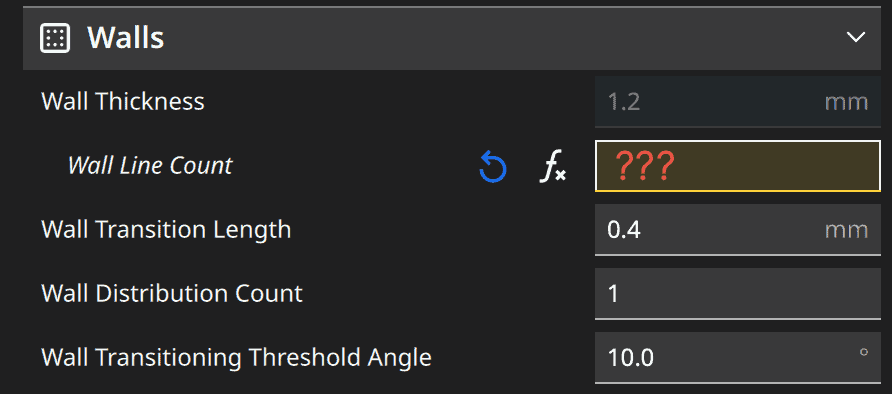
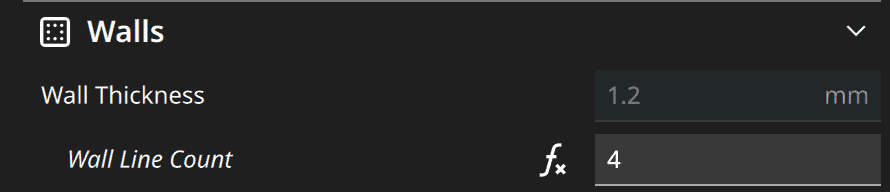
Wall Line Count
The “Wall Line Count” setting allows you to choose the number of walls you would like the 3D printer to print.
Wall Ordering
The “Wall Ordering” setting tells the 3D printer which walls to print first – the inner or outermost walls.

Outside to Inside
If you are engineering a part or prototype and you need precision, the tolerance needs to be perfect, you will want to set your wall order to print the outer wall first. You can have more precise measurements when you print the outside wall first.
Keep in mind that that comes with a caveat – you may end up with failure on your 3D prints. I don’t mean failed 3D prints, but failures on the actual print. Like oozing and dripping of the filament onto the print.
Printing the outside walls first reduces the angle of your overhangs – how far you can go before needing supports.
For example, when I print busts and they have a chin, the chin can come out kind of rough looking because
Inside to Outside
Printing the inside walls first will prevent failures on your prints and you tend to get cleaner print results.
I choose this setting by default for my projects because I rarely ever need my prints to be precise since I’m mostly printing various superhero models and busts. I don’t care if it’s dimensionally accurate. I just want it to look good.
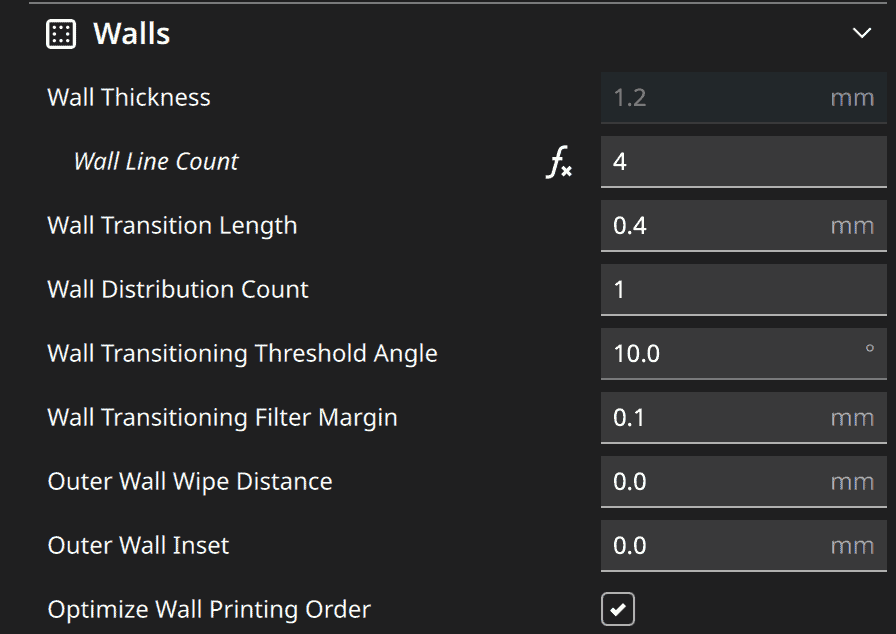
Optimize Wall Printing Order
This is a checkbox setting and by enabling it optimizes for maximum efficiency in the order it prints the walls.

Rather than always printing inner walls first or outer walls first, Cura will tell the printer to print each layer in the most efficient order.
This reduces the time it takes to print, as well as the number of retractions and travels needed.
Optimizing the order of printing also keeps everything close together, meaning that the printer is almost always printing instead of having to travel back and forth across the bed.
Additionally, it reduces the number of visual seams, resulting in a smoother finish.
The only caveat I have here is that this generates more complex g-code which will increase the render or time it takes to slice your file.
Personally, I don’t mind the extra time it takes to slice because the actual printing time is cut down with this setting.
Alternate Extra Wall
This is a checkbox setting that will add another wall layer every other layer as the print progresses.
This setting is useful because the key is that it allows the infill to interweave between the layers of the wall which increases the strength of the print.

Typically, the infill pattern prints right up to the wall which doesn’t allow it to bond well to those connection points. The interweaving creates a stronger infill pattern that is bonded to the walls of the print.
Horizontal Expansion
The “Horizontal Expansion” setting that changes the distance between the wall of the model and the outermost edge of the printed wall.
It’s used to slightly increase or decrease the overall dimensions of the object.
By default this setting is set to 0 because the 3D model is right up against the actual model and staying true to that model’s dimensions.
That’s a little confusing in text, so watch the video on changing the horizontal expansion setting to see what I mean.
This setting can also be used to compensate when you are having over-extrusion issues.
This is a great setting to use if you can’t get the parts of your model to fit together properly.
Hole Horizontal Expansion
The “Hole Horizontal Expansion” setting allows you to expand any holes that you may have in your model.
It works similarly to the horizontal expansion setting but when you expand the holes of a model, it does not expand the rest of the model and only widens the hole.
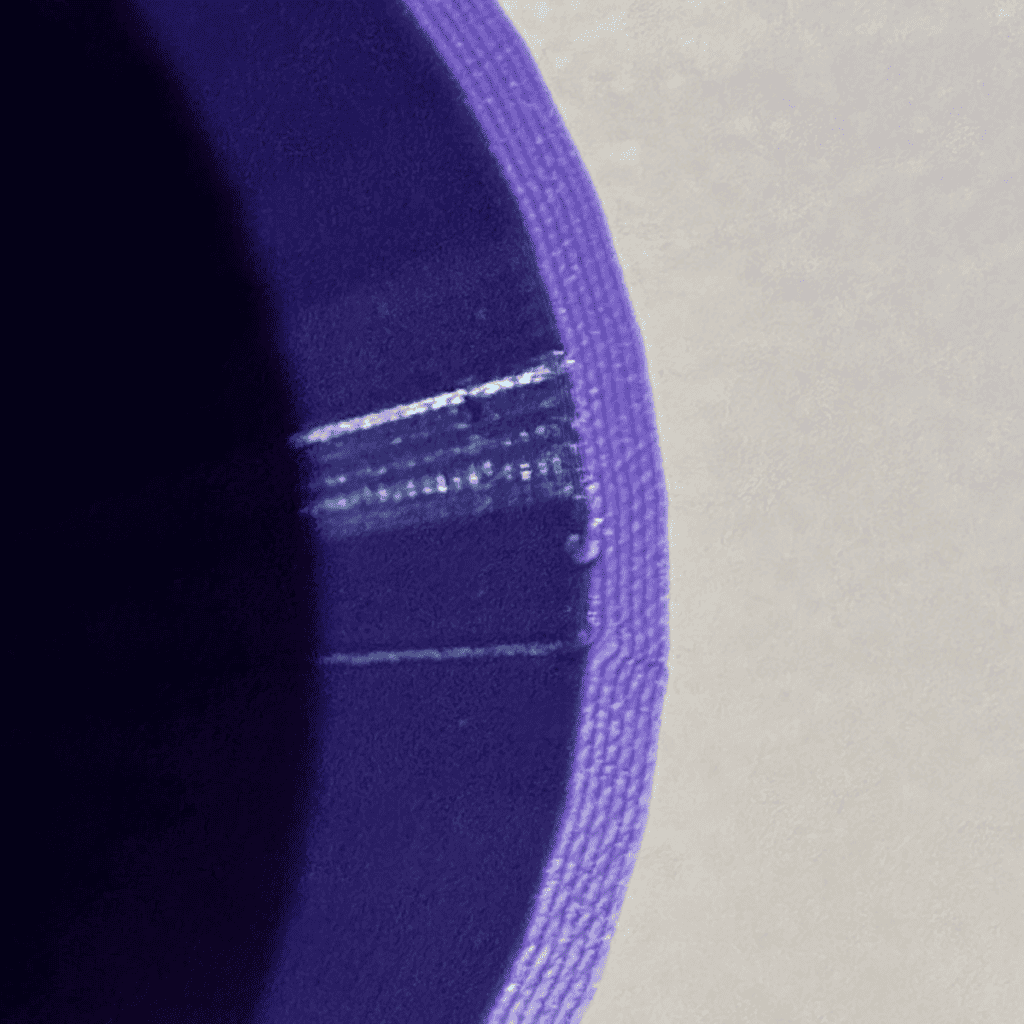
Adjust the Z-Seam for Better 3D Prints
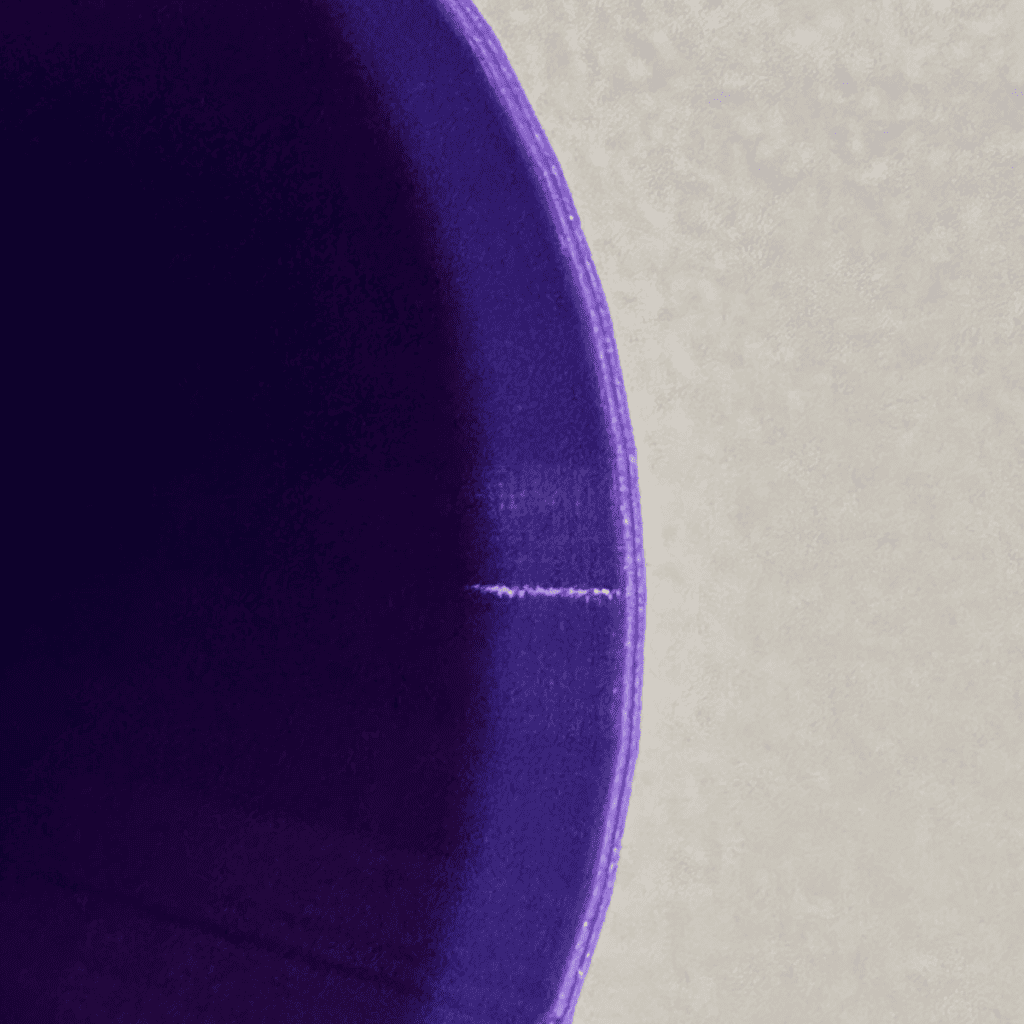
You may be having issues with the finish of your prints and may not even be aware that the z-seam may be the culprit. It is often most visible when you are printing a vase or something cylindrical.
A z-seam is the vertical movement of the nozzle as it moves up to the next layer of the 3D print. It’s caused by the nozzle moving up after completing the layer and starting again.
This movement of the nozzle occurring between layers can cause issues with your prints
Z-Seam Alignment
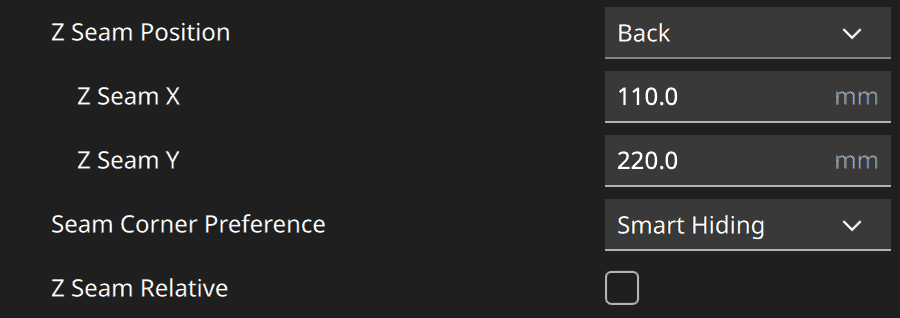
The “Z-Seam Alignment” setting will allow you to pick where the seam will be on the model. You can determine if you want a straight line up the back of the model or if you want the seam to be random.
You can see the z-seam when you are in the Cura software. You will see white dots all over your model. Those dots represent the starting point of the nozzle on each layer.
I like to choose the “smart hiding” setting on the seam corner preference where Cura will find the best places to hide the z-seam on each layer.
The other z-seam alignment setting that I like to use is the “user specified” which opens up a dropdown menu for “z-seam position” as well as some x and y positioning options where you can choose the position on the model where the z-seam should go.
I use the “user specified” option, position set to “back” in combination with “smart hiding” a lot for my busts and models that I know will be displayed with only the front and sides visible.
The addition of “smart hiding” of the z-seam does a really good job of automatically finding the best areas in the back of the print where I specified where I want the z-seam.
A Word on Functional Prints
If you are printing a functional print or 3D printed parts that require a lot of strength in some areas, be very careful with the placement of the z-seam. Those jump points create weakness in the print and you do not want those points to be in the areas that you need your print to be the strongest.